
This article contains affiliate links that will allow us to earn commissions without any extra cost to you. Read our full disclosure here.
Amazon sellers who want to rank for relevant keywords without burning money on PPC know how important listing optimization is. You’ve probably tried one or two keyword research tools to help you find the best keywords that would increase conversions, and you’re here to explore other options.
In this DataDive review, we'll talk about the tool's features and show you how we used it on our own listings and how it affected our sales.
Contents
What Is DataDive?
DataDive is an Amazon keyword and product research tool that is especially helpful to third-party sellers. It allows business owners to discover potential best sellers and to determine which products would be profitable and by how much. However, its most important feature is its ability to analyze competitors’ keywords to optimize listings and improve conversion rates.
DataDive works by pulling data from the following sources and presenting them in a more organized and insightful manner on your Google account:
- Helium 10
- Keepa
- Google Trends
- Amazon Seller Central
The tool is compatible with major Amazon marketplaces, including Japan, North America, and Europe.
DataDive Review: What Are the Tool's Best Features?
DataDive has three main features: Research Sheet, Data Dive Profits, and Ideas Sheet. Let’s look at what each of them can do.
Research Sheet
DataDive’s Research Sheet allows Amazon sellers to take data from their competitors’ listings, including the keywords they’re using and what they’re ranking for. This is then presented as a Master Keyword List.
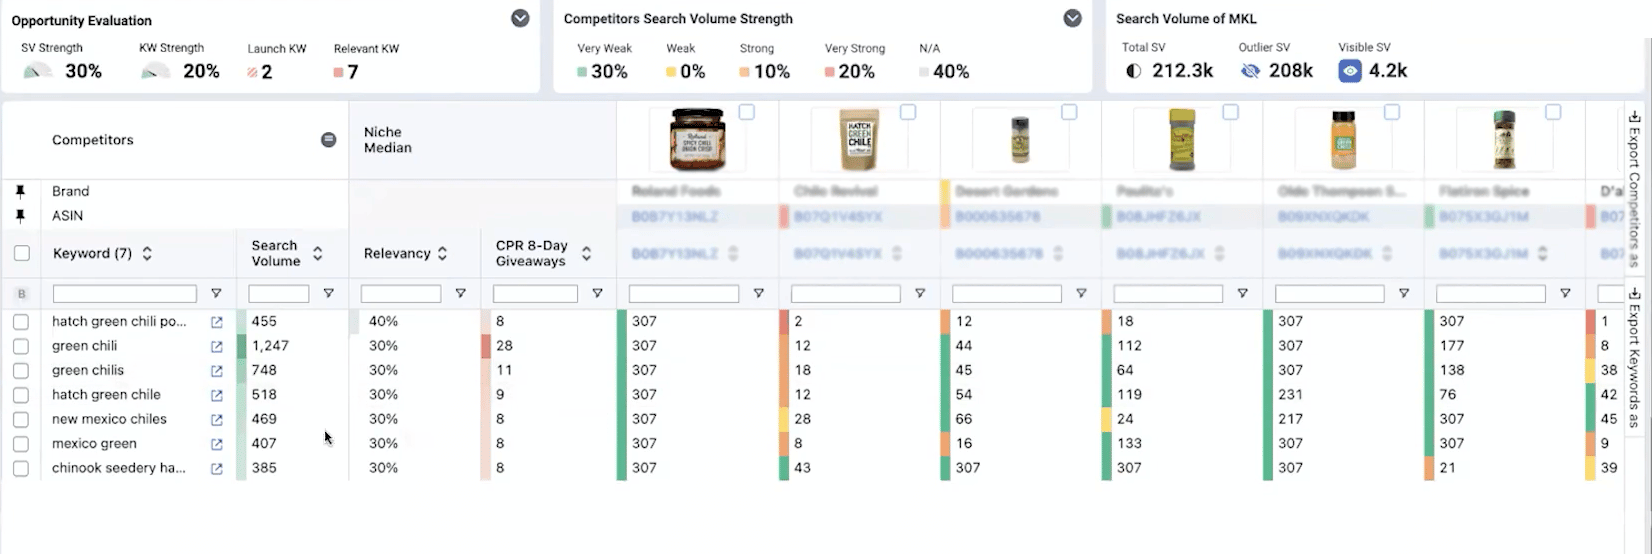
The best thing about this is it pulls data from multiple sources as mentioned before, so you get to see keyword recommendations based on current market trends. It also includes outlier keywords, i.e., those that are used by just a few of your competitors. (There may be some hidden gems in their listings that aren’t as popular with other sellers yet.) It also eliminates duplicate keywords so it’s easier to compose your title and product descriptions later.
DataDive Profits
This free feature gives you estimates of how much you can profit from your products after subtracting manufacturing and shipping costs as well as seller fees. DataDive Profits then gives logistics recommendations based on your product’s size and weight. You can use this along with EcomCrew’s Seller and FBA fees calculator.
Here’s a walkthrough of the process:
Ideas Sheet
The Ideas Sheet allows DataDive users to find potential best sellers by using trending keywords that have less competition. This allows you to find products from untapped markets.
DataDive Pricing
DataDive has multiple plans you can choose from:
| DataDive Plans | Inner Circle | Standard | Yearly Standard | Enterprise |
|---|---|---|---|---|
| Main Seat | $49/month | $149/month | $1,449/year | Price varies |
| Additional Users | $35 each | $73 each | $730 each | |
| Additional User Limit | 4 | 4 | 4 | None |
The Inner Circle plan is for those who are members of Seller Systems, a program that includes private-label courses and masterminds, founded by DataDive CEO Brandon Young. Inner Circle members are also eligible for discounts if they choose the Yearly Standard plan.
Those who want to have unlimited users can avail of the Enterprise plan, but the pricing is on a case-to-case basis, and you’ll have to contact their customer support at support@datadive.tools to get a quote.

How to Optimize Amazon Listings Using DataDive
Listing optimization through keyword research is where DataDive shines. Here’s the step-by-step process of how to do it. We also have a Secret Sauce mini-class where we took actual Amazon listings and improved the titles to increase their conversion rates.
Step 1: Prepare your tools
Sign in to your Amazon Seller Central Account. And if you haven’t already, sign up with DataDive and download the Chrome Extension. You’ll also need to have a Helium 10 account (sign up here for a 10% discount) and download the Chrome extension as well.
Unfortunately, you really have to pay for Helium 10 to use all of DataDive’s features because as mentioned earlier, it pulls data out of this tool, and it works hand in hand with Helium 10’s Xray.
Step 2: Find competitors’ listings on Amazon
Go to Amazon and enter your desired keyword. This should be something you want to rank for. You can also click on Niche Dive to find other relevant keywords.
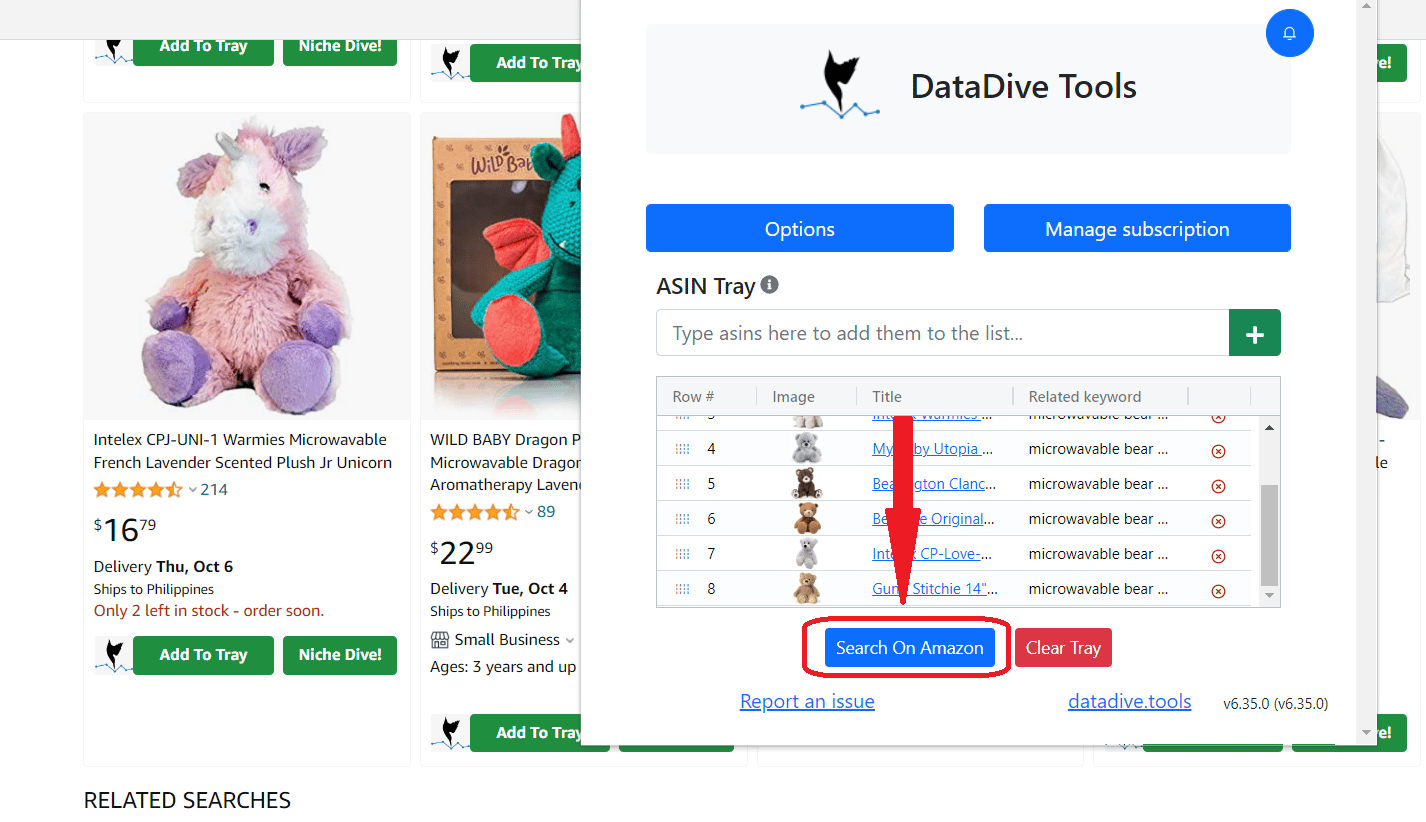
From here, go through the listings and pick the ones that you think are your best competitors. Remember that if it isn’t your first data dive, you need to clear your tray first. When you find a listing you like, click on “Add to tray.” Don’t forget to include your own listing in the tray so you can compare your data.
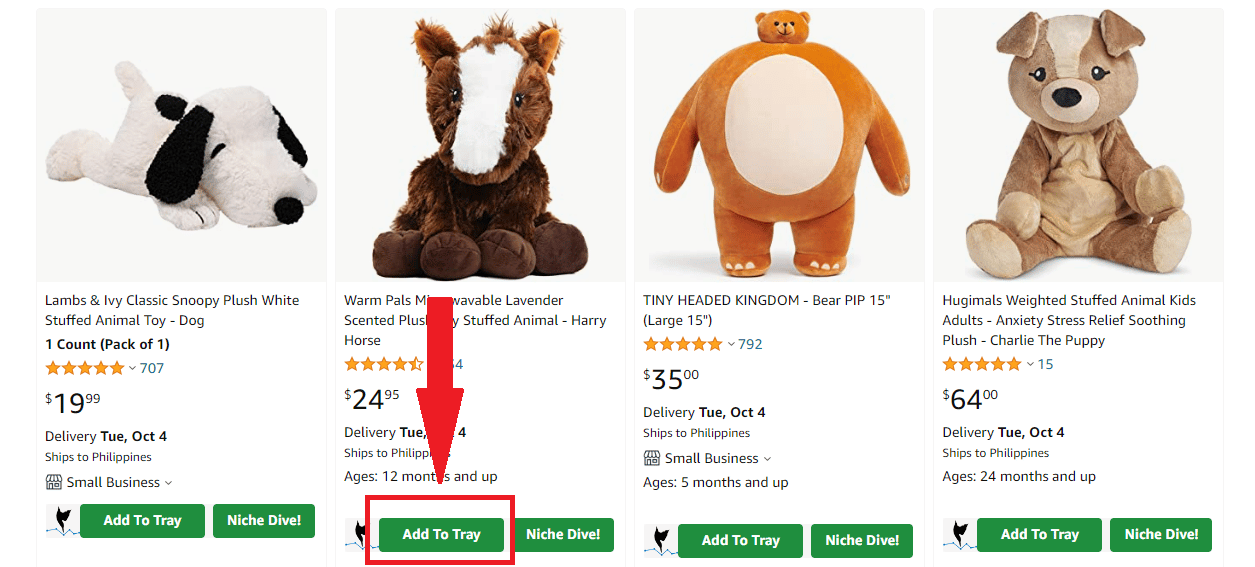
The recommended number of listings is from 10 to 15. Of course, the more relevant listings you include, the better the analysis, but at some point, it becomes too many.
Step 3: Use Helium 10’s Xray
Go to the DataDive Chrome Extension and then click on “Search on Amazon.” This shows you the listings you’ve added to your tray. Note that if a product is out of stock, it might not show up on that page.
Next, we’re going to use Helium 10’s Xray. Click on the Helium 10 Chrome extension and on Xray. The Xray window already shows you a bunch of data from the chosen listings such as price, sales, and revenue. But we want to organize our data further, particularly the keywords used.
Step 4: Perform a data dive
From the Xray window, click on “Dive!” and grant permissions to your Google Drive account. Again, DataDive uses your Google account, particularly Google Sheets to organize data. This is advantageous because it’s easier to access and share with employees.
You’ll then be directed to the Master Keyword List where you can see the keywords used by your competitors as well as the relevancy and search volume.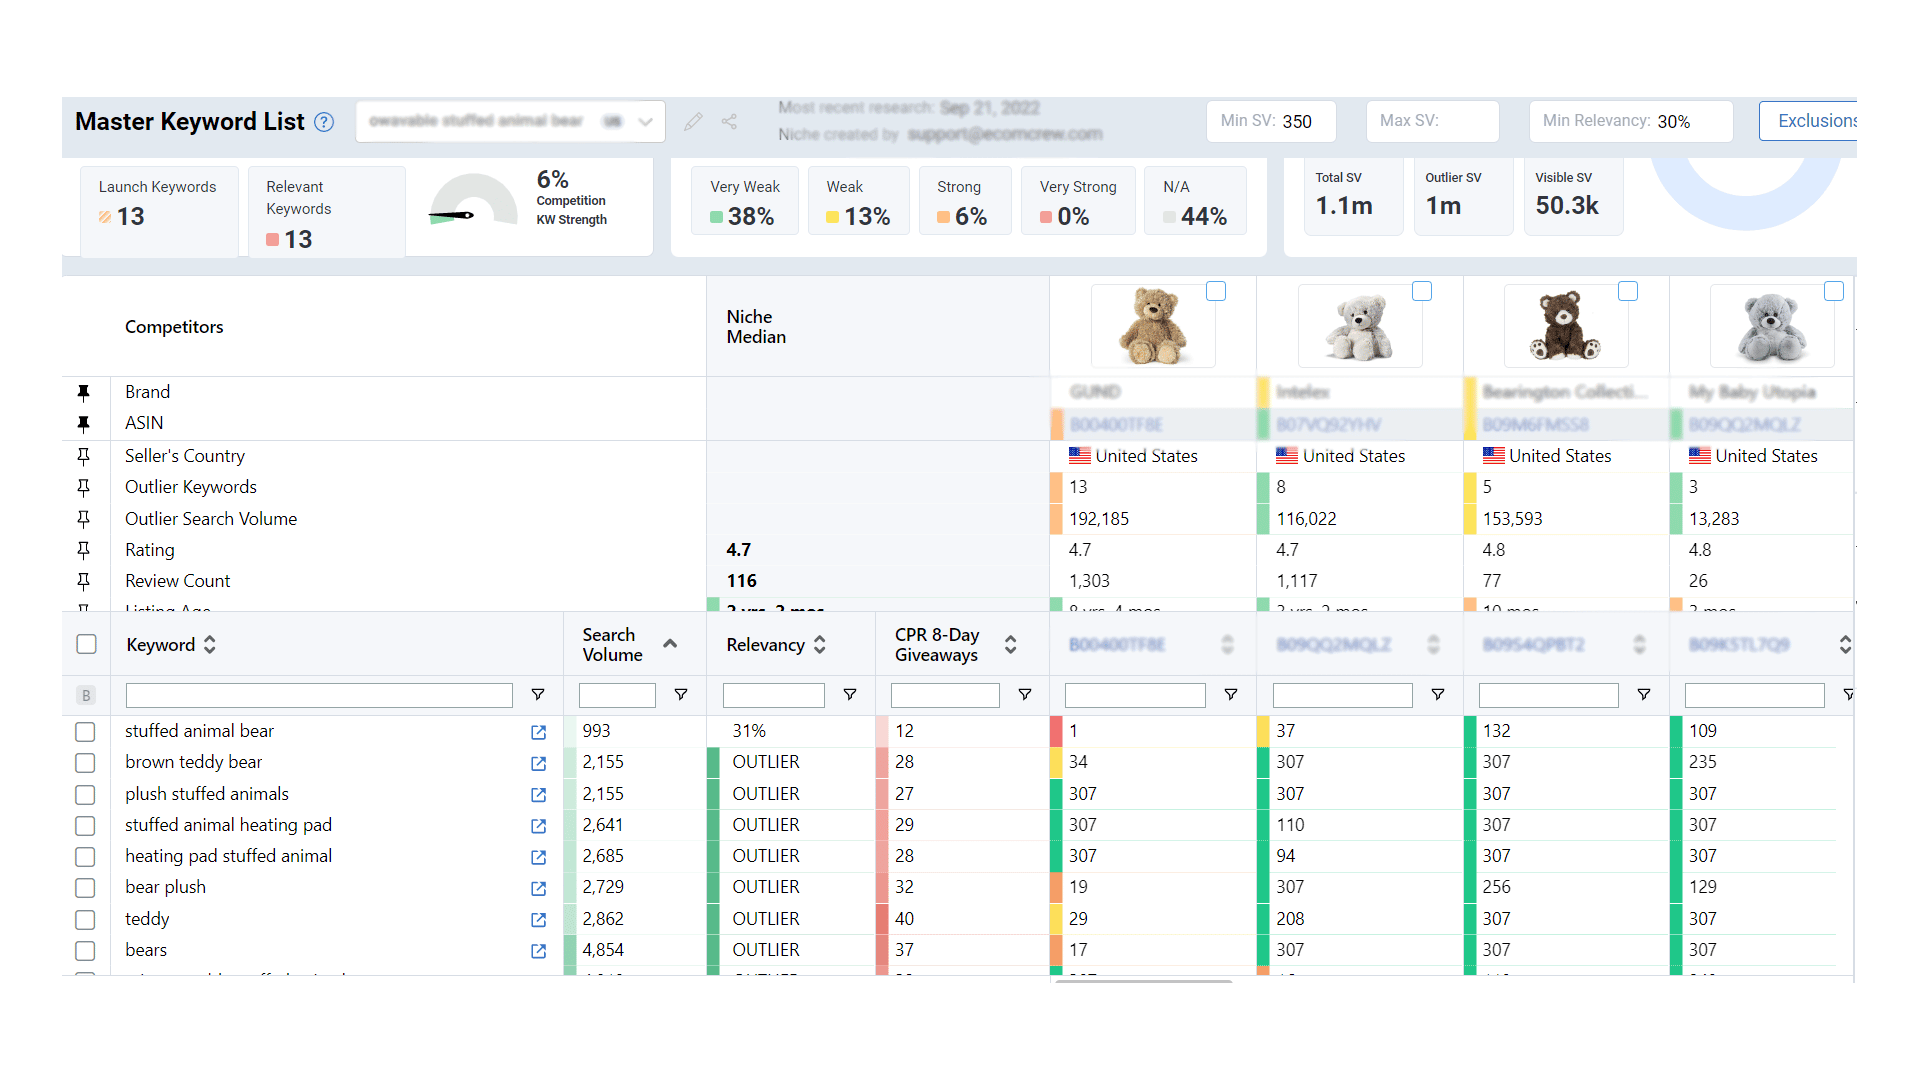
Step 5: Optimize your listing
On the left sidebar, you’ll find a rocket icon called Launch. Under that, you’ll find Listing Builder. Click on it, and it shows you different sections for the title, bullets, description, and search terms. This is where you get to play around with the keywords, and you can see the changes to the ranking juice as you add or remove keywords.
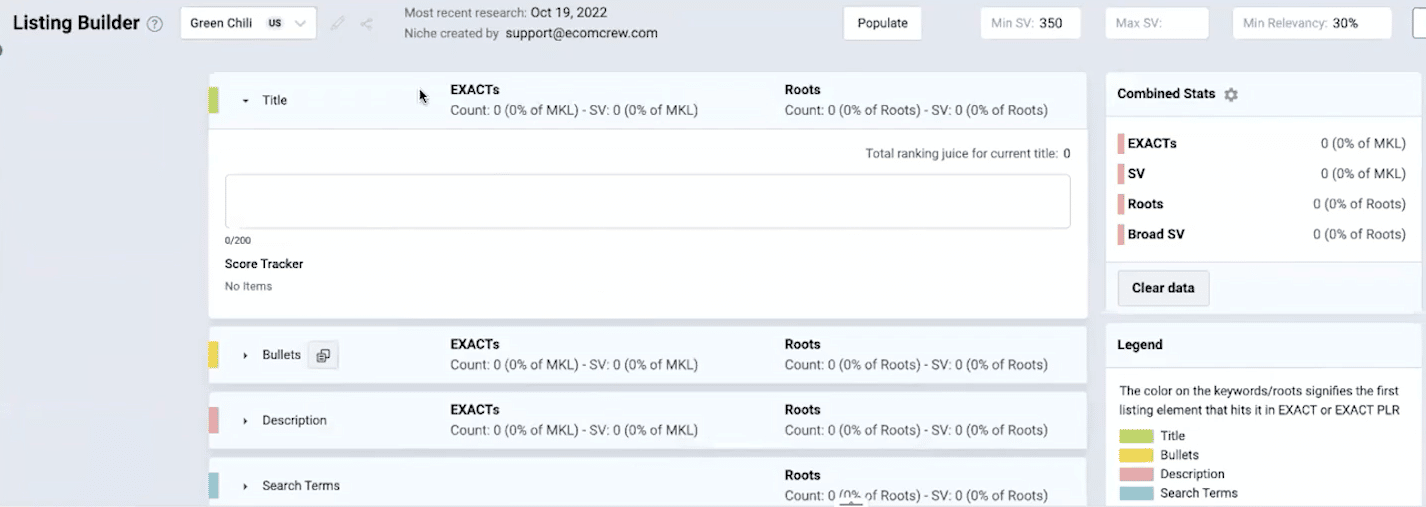
The first thing you need to do is paste your current title, bullets, etc. so you have a baseline. You’ll get a ranking juice score for that, and the goal is to improve it significantly.
For titles, in particular, click on “Battle of the Titles” on the sidebar. It will show you the ranking juice of your chosen competitors’ current titles as well as the common keywords used.
Don’t forget to check out the outlier keywords as well. These are the keywords used by just a few of your competitors and may include keywords you can’t use such as brand names. But every now and then, something comes up that can really increase that ranking juice or give you an idea of a related keyword you can add.
Do this with the other parts of your listing, and observe your sales in the next weeks or months.
Pros and Cons of Using DataDive
Pros
- DataDive uses your Google account, so you can access your data anywhere.
- More organized and insightful keyword research data
- The Chrome extension makes it convenient to analyze listings and competitors
- DataDive Profits is free.
- Ability to pool data from multiple sources
- Shows outlier keywords
Cons
- Limited number of users for non-Enterprise plans
- Needs a Helium 10 subscription to get the full benefits
- There’s a daily limit of 250 data dives.
Case Study: Before and After DataDive Optimization
DataDive has been our tool of choice for listing optimization. We’ve examined our Amazon listings and tracked our sales over time to see if the changes we implemented really had an impact on sales.
Here are graphical representations of the increase in sales of 3 products from different brands.
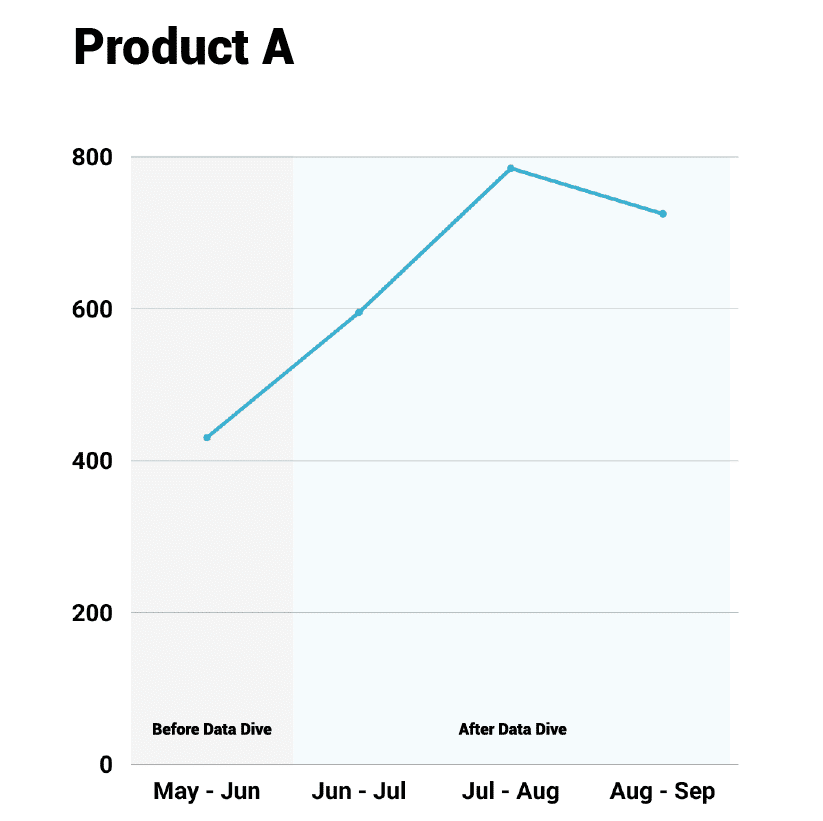
Product A went from selling 430 units (14.3 units per day) the month before our first data dive to selling 785 units (26.2 units per day) just two months after.
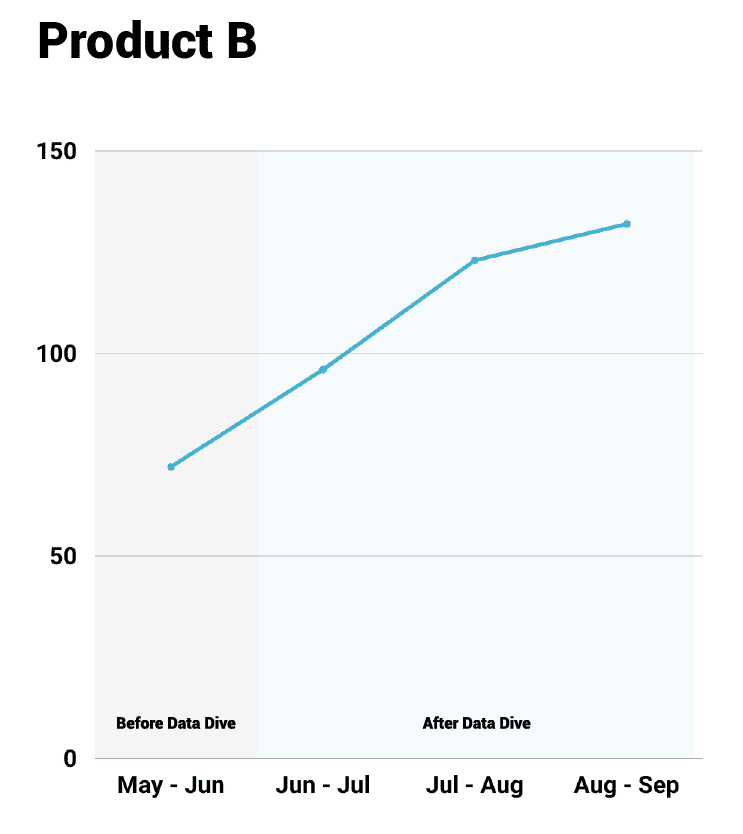
Product B, on the other hand, went from 72 units (2.4 units per day) before DataDive to 132 units (4.4 units per day) three months after.
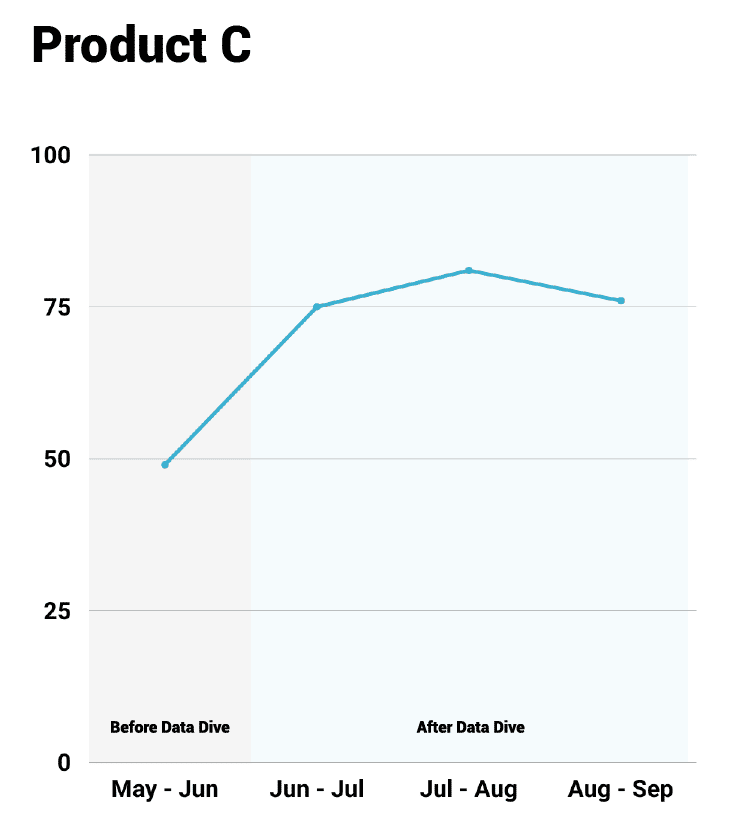
Overall, the results are very satisfactory, and we're seeing the same trend in our other products across all the brands we own. Our Customer Experience Specialists are hard at work in regularly checking and modifying our listings to stay on top and to keep the ranking juice high.
Final Thoughts
DataDive is a great tool if you're looking to optimize your Amazon listings and see significant results in a short amount of time. While there are other keyword tools out there, we haven't seen one that's better at organizing data (and we're not just saying this because we're affiliated with them).
The tool has really made a difference in our rankings and sales as evidenced by the data we've gathered. If you know of any listing optimization tool that you would recommend, tell us in the comments section.


